DomainKeys Identified Mail (DKIM) is an anti-tamper protocol that ensures security of all emails in transit. The protocol uses digital signatures to check that the email was sent by a specific domain.
DKIM is enabled by default on all outgoing mails on Plesk. However, it is not automatically enabled on a custom domain. To set up DKIM on a custom domain of your choice, follow the steps mentioned below.
DKIM setup for a custom domain
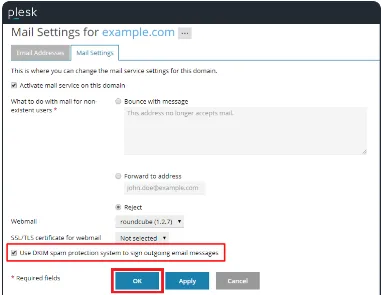
- If you use Plesk as your DNS provider, log in to your account and go to ‘Domains’ > ‘example.com’ > ‘Mail Settings’.
- Check the box marked as ‘Use DKIM spam protection system to sign outgoing email messages’.
- Click on ‘Save’.
If your DNS server is not Plesk, follow these steps to add a DKIM key to your DNS server :
- Log in to Plesk.
- Go to ‘Domains’ > ‘example.com’ > ‘Mail Settings’ > ‘How to configure external DNS’.
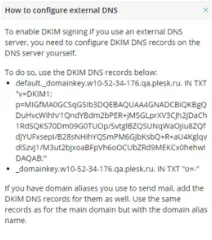
- The DKIM records will be shown in a pop-up window. Copy the records generated.
- Now go to your DNS management console, and publish the DKIM keys.
- Wait for 24-48 hours for the changes to take effect.
Check your DKIM records using our free DKIM validator tool.