DKIM (DomainKeys Identified Mail) is an email authentication protocol that helps prevent phishing, email spoofing, spamming, and other cyber attacks that use emails to break into an organization’s or individual’s system. It legitimizes the emails so that recipients are aware that the email originated from a particular organization.
For detailed information on DomainKeys Identified Mail, read more on What is DKIM?
Before you can set up DKIM for Mailchimp, you’ll need to verify your domain on Mailchimp.
- Verifying Your Domain
-
- Go to your Mailchimp account.
- Navigate to ‘Accounts > Settings’ and select ‘Domains’.
- On the ‘Manage Domains’ page, select the ‘Verify Domain’ option.
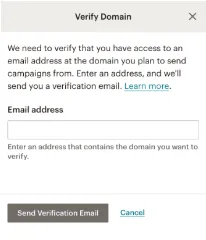
- A dialog box will appear with the option to enter your email address, as shown in the image below:
- Verify your email after receiving the verification code by clicking on the ‘Verify Domain Access’ button.
- Setting Up DKIM on Mailchimp
-
- Go to the ‘Manage Domains’ page again and click on the ‘Authenticate’ button.
- Create a CNAME record when the prompt box appears asking you to create a CNAME record for k1._domainkey.domain.com with the value: dkim.mcsv.net.
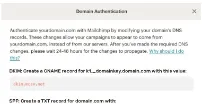
- Publish the CNAME record in the DNS you use. It usually takes around 48 hours for the settings to take effect.
- Click on the ‘Authenticate Domain’ button to finish setting up DKIM and completing the process.
Use the tools provided by emailauth.io to look up and validate your newly created DKIM record here.