Setting up DKIM on Zoho Mail involves three significant steps:
- Creating a unique domain key on ZOHO mail
- Creating a TXT record in your Domain’s DNS registrar
- Validating the selector and Enabling DKIM signing on Zoho Mail
Creating the Domain Key on Zoho Mail
- Log in to the Control Panel on Zoho Mail here (you need to be a super administrator to create a Domain key).
- Go to the ‘Email Configuration’ tab and choose ‘DKIM’.
- Navigate to ‘Domains’ and choose the domain you want.
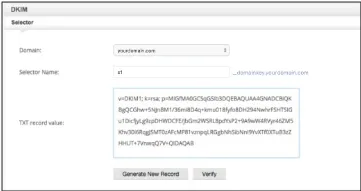
- Click on ‘ADD’ to add a new selector.
- Provide the selector name.
- Copy the TXT record that will be generated.
Adding and publishing the TXT record to your DNS manager
- Login to your domain’s DNS Manager.
- Create a TXT record in the DNS with the title as <selector>._domainkey.<yourdomainname.com>
Ex: emailauth._domainkey.infosecventures.com should be the name of the TXT record if the selector you choose is emailauth. - In the TXT record value, paste the TXT Record Value you copied in Zoho.
- Save the TXT record.
Enabling DKIM for your domain on Zoho Mail
- After the validation of the DKIM is successful on the DNS site, log in to Zoho Mail Control Panel.
- Select ‘Verify’ across the particular selector. The text record will then change to ‘Verified’.
- Once it is verified, you will see a prompt to enable DKIM immediately or later. It is advisable to enable it immediately to sign emails with DKIM.
- Once it is done, Zoho Mail will add DKIM signatures to all the emails generated from your domain.
Check your DKIM records using EmailAuth’s free DKIM Record Checker.